明月出天山,苍茫云海间。
——《关山月》
借助 Colaboratory(简称 Colab),您可在浏览器中编写和执行 Python 代码,并且:无需任何配置,免费使用 GPU,轻松共享。
『个人理解』以上是官方介绍的片头,说说自己的理解:大多数人最初使用Colab都是为了免费薅Google的羊毛,大概18年左右Colab横空出世,最响亮的slogan就是免费的GPU/TPU,免费的算力等您来,说到底是个习惯养成的游戏。果然,2020年初,Colab Pro会员政策开始了,付费分配更好的算力(V100/T4/K80中优先给V100 XD),更长的代码持续计算时间(一般用户代码运行12H自动中断),以及balabala的差异化方案。另外说,如果真的在colab上运行大型的算法,背后的数据集无论是放在Drive还是GCS上,都是一笔额外的开销,顺便继续挖掘潜在用户,一举多得!
『迁移难度』已经熟悉使用Jupyter的码农对于Colab的界面应该毫不陌生,迁移上手难度几乎为0。Colab自身配置的解释行,可以通过一行代码切换Py2/Py3和TF1.x/2.x,这都是十分舒服的用户体验。
『常用场景』就仅说说我的环境吧:固定工作地点使用配置GPU的主机,云上TFRC支持的TPU和GPU都有,数据部分在远程NAS中部分在GCS中,不经常用的数据放在冷库(coldline)。综上,离开工作地点,需要协同合作 or 展示需求,或者尝试自己不熟悉的代码段的时候,作为一个云端共享Jupyter使用。
Colab在绘制Matplotlib时无法正确显示中文标签/中文乱码 在Colab上调用Matplotlib绘图显示中文,显示乱码,找不到中文字体,此时就需要手动给Colab安装中文字体了。
首先查看虚拟机中的本地字体:
通过执行 !fc-list :lang=zh 命令,发现结果为空,说明Colab的虚拟机 Ubuntu 操作系统没有支持中文的字体。
查找并下载安装需要使用的字体:
字体文件是以 .otf 或者 .ttf 结尾,SimHei 下载链接
Ubuntu的字体目录位于 /usr/share/fonts/truetype 。
Colab中以!起始的命令调用执行系统命令。
1 2 3 4 5 !wget "https://www.wfonts.com/download/data/2014/06/01/simhei/simhei.zip" !unzip "simhei.zip" !rm "simhei.zip" !mv SimHei.ttf /usr/share/fonts/truetype/
测试Matplotlib正确输出显示中文字符
1
2
3
4
5
6
7
8
9
10
11
12
13
14
15
16
17
import matplotlib.pyplot as plt%matplotlib inline import matplotlib.font_manager as fmpath = '/usr/share/fonts/truetype/SimHei.ttf' fontprop = fm.FontProperties(fname=path, size=13 ) figure = plt.figure(figsize=(8 ,4 ),dpi=80 ) ax = figure.add_axes((0.1 , 0.1 , 0.8 , 0.8 )) plt.plot(X_test,y_test, 'c*-' , color=(1 , 0 , 0 , 1 ), linewidth=2.0 , label='实际值' ) plt.plot(X_test,test_predict, 'c*-' , color=(0 , 0 , 1 , 1 ), linewidth=2.0 , label='预测值' ) plt.title("模型结果" ,fontproperties=fontprop) plt.xlabel("X值" ,fontproperties=fontprop) plt.ylabel("Y值" ,fontproperties=fontprop) plt.legend(loc = "lower left" ,prop=fontprop) plt.show()
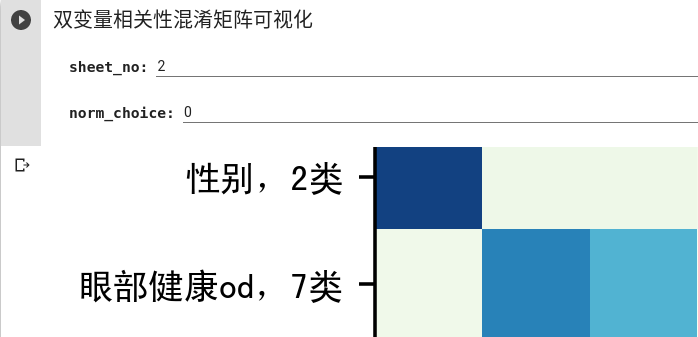
使用表单交互Colab变量输入 Colab交互式表单是格很棒的功能,简单清洗明了,表单中的数据以str格式读入,经过进一步字符串处理后得到实际变量。使用效果如下:
1 2 3 4 5 6 7 8 9 10 11 12 13 import pandas as pdimport numpy as npimport matplotlib.pyplot as pltfrom matplotlib import tickerfrom sklearn.preprocessing import normalizeimport matplotlib.font_manager as fmsheet_no = '2' sheet_no = int (sheet_no) norm_choice = '0' norm_choice = bool (int (norm_choice))
Colab关联Google Drive 在过去进行实验的时候,大量训练与测试数据的获取、存储与加载一直是令人头疼的问题,在 Colab 中我们可以将 Google Driver 挂载到当的工作路径:
1
2
3
4
5
from google.colab import drivedrive.mount("/content/drive" ) print ('Files in Drive:' )!ls /content/drive/'My Drive'
然后通过正常的 Linux Shell 命令来创建与操作:
1 2 3 4 5 6 7 8 9 10 11 12 13 14 15 16 17 18 19 20 !mkdir -p drive/kaggle/talkingdata-adtracking-fraud-detection !mkdir -p drive/kaggle/talkingdata-adtracking-fraud-detection/input /train !mkdir -p drive/kaggle/talkingdata-adtracking-fraud-detection/input /test !mkdir -p drive/kaggle/talkingdata-adtracking-fraud-detection/input /valid !wget -O /content/drive/'My Drive' /Data/fashion_mnist/train-images-idx3-ubyte.gz http://fashion-mnist.s3-website.eu-central-1. amazonaws.com/train-images-idx3-ubyte.gz %env DIR=/content/drive/My Drive/Data/animals/cats_and_dogs !rm -rf "$DIR" !mkdir -pv "$DIR" !wget -O "$DIR" /Cat_Dog_data.zip https://s3.amazonaws.com/content.udacity-data.com/nd089/Cat_Dog_data.zip !(cd "$DIR" && unzip -qqj Cat_Dog_data.zip -d .)
Reference
https://colab.research.google.com/ https://cloud.google.com/storage/docs https://juejin.im/post/5d07b8cd6fb9a07eb94f8c94 https://colab.research.google.com/notebooks/io.ipynb